Unity Reading a Jump Input That Isn't Real
Version 1.0.ii of the input system was used forth with Unity 2020.3
Warning! If you are looking for a quick 5-minute caption of Unity's new input organization - this isn't going to exist it - and you aren't going to find i! The new arrangement is more complex than the old system. Especially when it comes to simple things similar knowing when the spacebar has been released.
I'chiliad going to practice my best to be concise and get folks up and running, but information technology volition have some try on your office! You will likely need to dive into the absolutely opaque Unity documentation if y'all take a special utilise case. Information technology's just the fashion information technology is. Input is a circuitous topic and Unity has put together a organization that can nicely handle that complexity.
And then Why Utilise Unity's New Input System?
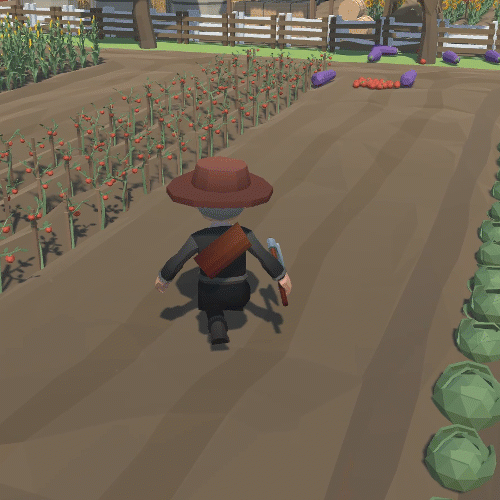
Using Unity'south "NEW" Input system to motility, jump, rotate the camera, play SFX, shoot and accuse up a power Shot
I've got three reasons. Three reasons I've stolen, but they are good reasons to utilise the new Input System.
If you desire players to be able to use multiple devices OR you are developing for multiple platforms the new system makes it very very piece of cake to do and then. Bluntly, I was shocked how easily I could add a gamepad and easily switch dorsum and forth between it and a keyboard.
Information technology's Event-Based! When an action is started, completed (performed), or canceled an outcome tin can exist called. While you lot will still need to "poll" values every frame for things like histrion or camera motion, button presses for other $.25 such as jumping or shooting no longer need to clog an update function! While this adds some perceived complexity - especially if you don't feel comfortable with events - but it is an crawly characteristic.
Input debug organization! Unity provides an input debugger so you can see the exact values, in real-fourth dimension, of your system'southward input. This makes it so much easier to see if a device is recognized and functioning properly. AND! In the case that you lot do need to do some polling of an input value (recollect similar to the onetime system in an update function), information technology's much easier to see what buttons are beingness pressed and what those input values look like.
And so yeah! Those are pretty fantastic reasons. The new input arrangement does take some time and patience to larn - doubly so if you lot are used to the old arrangement, merely hopefully, you'll hold the effort is worth it.
Setting It Up

To get started, you'll need Unity version 2019.1 or newer and the organization is added via the package managing director. When importing the system you will likely become a popup with a warning to change a setting. This setting is all most which system Unity will apply to get input information from. Yous tin make further changes in Project Settings > Player > Agile Input Treatment. From at that place, you can choose to employ either the new system, the old system, or both.

If you tin't go the new system to office, this setting would be worth checking.
Next, we demand to create a new "Input Actions" asset. This is washed like any other asset, past right-clicking in a project folder or using the asset bill of fare. Make sure to give the nugget a good proper noun as y'all'll be using this name quite oft.
With the nugget created you lot can select it and so in the inspector press "edit nugget." This will open a window specific to THIS input action asset.
So if you take more than 1 input activity asset, you will need to open boosted windows - at that place is no mode to toggle this window to some other asset. Personally, I found this a flake confusing when first getting started as it feels different than other Unity windows and functionality.
Inside the Input Action Window
This is where all the setup happens and there's a lot going on! In that location are way more options in this window than could mayhap be covered in this video or even several more than videos. Only! The basics aren't also complex and I'1000 going to try and look at some of the more than common apply cases.

Input Activeness Nugget Window - Including added Actions for Movement and Bound
On the left, you'll run across a column for "Action Maps." These are essentially a set of inputs that can be grouped together. Each Input Activeness asset can have multiple action maps. This can be useful for unlike control schemes for example if your player can hop in a car or maybe on a equus caballus and the controls will be different. This can besides be used for UI controls - so that when a carte is opened the actor object stops responding and the controls for a gamepad at present navigate through a menu.
To be honest, I haven't yet figured out a nice clean manner to swap action maps but it might be the topic of a future post/video and so let me know (comment below) if yous are interested in seeing that.
To create a new action map simply press the plus at the top correct of the column and give the action map a skilful name. I've chosen mine "Thespian."
The heart column is where our deportment get defined. These are not the buttons or keys that will be pressed - those are the bindings - but these are the larger deportment that nosotros desire the thespian to exist able to do such as motion, jump, or shoot.
To get started I'm going to create ii actions ane for move and one for jumping.
Each action has an "activeness type" and a "control type" - you can see these to the correct in the image higher up. These options tin can easily feel ambiguous or even meaningless equally they can seemly have little to no bear on on how your game plays - but when you want to actually dial in the controls they can be very useful

Actions types come up in 3 flavors value, push and passthrough. The main difference betwixt these 3 is when they call events and which events become called.
Link: Unity Action Type Documentation
Value Activity
The Value action blazon volition call events whenever a value is changed and information technology will phone call the events started, performed, and canceled (more on these events later).
The "started" effect will go called when the control moves abroad from the default value - for instance, if a gamepad stick moves away from (0,0).
The "performed" consequence will then get chosen each time the value changes.
The "canceled" event will get called when the control moves back to the default value - i.e. the gamepad stick going back to (0,0).
This would seem like a good pick for movement. However, the events are only called when the values change, then information technology won't become called if the player holds down the Due west key or keeps the gamepad stick in the same position. That's not to say it'southward not useful, merely at that place are potentially other problems that need to be solved for creating player move if this activity blazon is used.
Button Activeness
The button action blazon will call events based on the country of the button and the interactions assigned to the action itself. The interactions, which we will get to, will define when the performed and canceled events are called. In the end, the Push button action type is what you want when events should be called when a push is pressed, released, or held. And then far in my experience, this covers the majority of my apply cases and is what I'll be using throughout this tutorial.
PassThrough
The PassThrough action type is very like to the value activity type. It will telephone call the performed event any time the control changes value. Only! It will not call started or canceled.
The passthrough activity also does not exercise what Unity calls disambiguation - significant that if two controls are assigned Unity won't be smart and try to figure out which one to use. If this sounds similar something y'all might need to know about, check out the Unity documentation.
If your head is starting to spin and your getting lost in the details. That's off-white. This system is far more than powerful than the quondam organization, only as a trade-off, there are way more than bits and pieces to it.
Interactions

Interaction Types
I'yard not going to go too deep into the weeds on interactions, but this is where nosotros can refine the behavior a bit more. This is where we tin can command when the events become invoked. We accept options to hold, press (which includes release options), tap, slow tap, and multi-tap. All of these interactions were possible with the old organization, simply in some cases, they were a bit challenging to realize.
For the virtually office, I found that interactions are fairly self-explanatory with some potentially confusing nuance between tap and slow tap. The documentation while a flake long does a cracking job of clarifying some of that nuance.
Link: Unity Documentation on Interactions
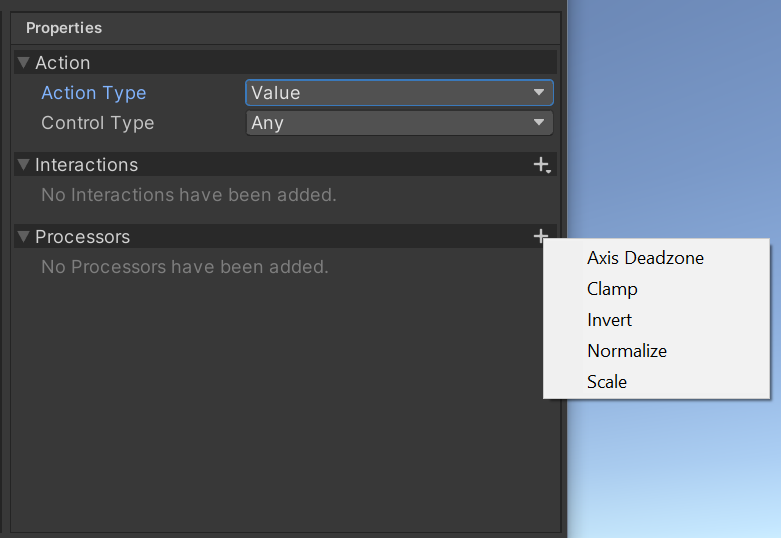
Processor Types
Processors
Sometimes you need or want to make some adjustments to the input values such as scaling or normalizing vectors. Essentially processors permit you to do some math with the input values before events are called and values are sent out. These aren't terribly complex and are going to be very use case specific.
Link: Unity Documentation on Processors
Adding Bindings
Notwithstanding with me? Now that nosotros have our actions gear up nosotros demand to add bindings - these are the bodily inputs from the player! Remember key presses or gamepad stick movements. I'm going to create bindings for both the keyboard and a gamepad for all the controls. This is a tiny scrap more than work, only once nosotros get to the lawmaking, the inputs will be handled the same which is really powerful!
Movement
The get-go binding will be for the keyboard to apply the WASD keys for motility. We need to add together a 2D Vector Composite. To find this option y'all'll demand to right-click on the movement activeness. This will automatically add together in four new bindings for the 4 directions.
Blended bindings essentially allow united states of america to combine multiple inputs to mimic a different input device, i.e. using the WASD in the aforementioned manner equally a gamepad stick. You lot may notice that there is a way option, but for our use case either digital option will work.
Notice too, that interactions and processors can be assigned to individual bindings allowing more customization! These interaction and processors work the same for bindings as for actions.
Link: Composite Fashion Documentation (curlicue downwardly just a bit)

Add 2D vector Composite Binding by right Clicking on the Motion Action
With the WASD binding created we then need to assign keys or the input path. We can do this by clicking on what looks similar a dropdown next to "path." If this dropdown is not present click the T button which toggles betwixt the dropdown and typing.
Then you lot tin can select the correct cardinal from the list. OR! Press the listen push and and then press the push button you want for the binding. Information technology couldn't be much easier.

Add bindings by search or using the "Heed" functionality
The second binding will exist for the gamepad. You can but click on the plus for the motility action and choose "Add Binding." Selecting this bounden yous will meet options to the correct. Once again you can use the "heed" option and move the gamepad stick, but it only allows one direction on the stick. Perhaps there's a way around this but I haven't found it! So select whatsoever management and nosotros'll edit the path manually to take in all values from the stick.
One time you take a path, click the T button to manually edit the path. From there we'll remove the direction-specific office. In my case this will look similar <Gamepad>/leftStick with this done you tin click the T button once more and the path should be only the left stick.
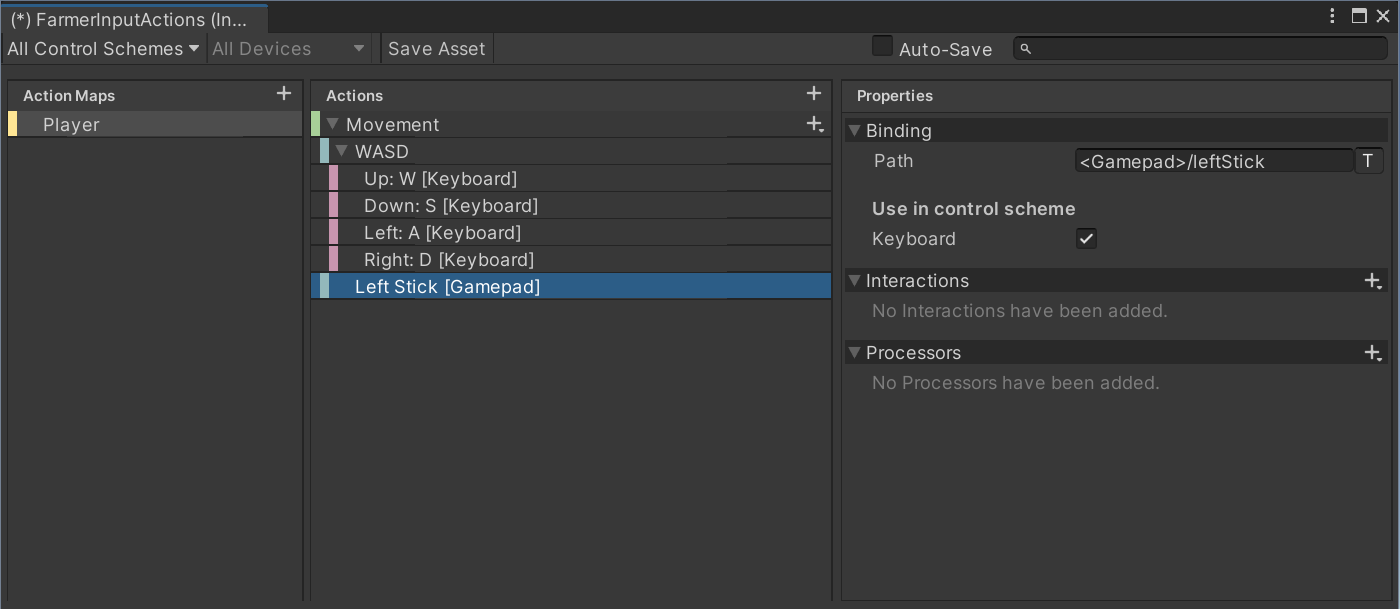
Calculation the Left Stick Binding
Leap
I'll repeat the procedure of calculation bindings for the jump action. Adding in a binding for the spacebar and the "south" push button on my gamepad. Unity has been pretty clever here with the gamepad buttons. Rather than give control specific names they have cardinal directions then that the "south" button will piece of work regardless of whether it is an Xbox or Playstation controller.
At present that we take the bones actions and binding implemented. We're most prepare to get into the code. But kickoff! We need to make sure the asset is saved. At the acme correct there is a save asset button. This has caught me out a few times, make sure you press it to save changes.
There is as well an car-save feature, which is peachy until yous generate C# code (which will talk about in a minute). In that example, the autosave tends to make the interface laggy and a bit harder to utilize.
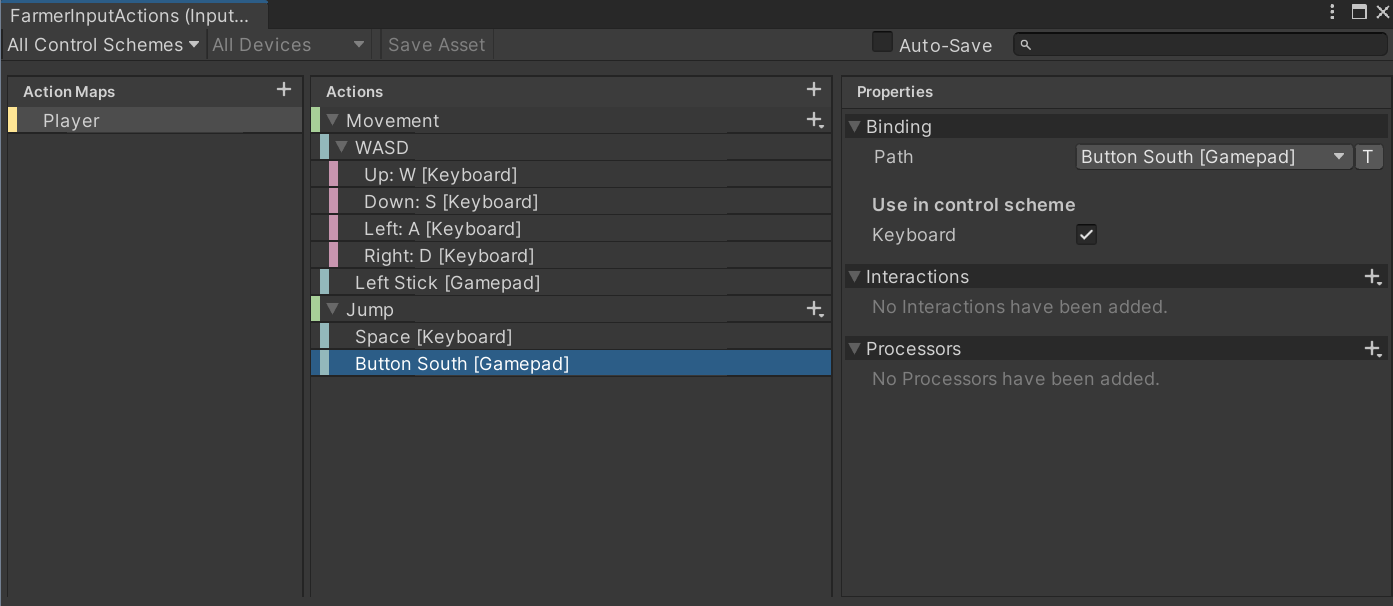
Adding the Jump Binding
Implementation
There is a default player controller that comes with the input system. Information technology has its place, merely in my stance, if you've come this far it'southward worth earthworks deeper and learning how to use the input organization with your own lawmaking. Information technology's also important to know that the input system can communicate past broadcasting messages, drag and drop Unity Events, or my preferred method C# events.
Video Tutorial: Events, Delegates, and Actions!!!
If you lot aren't familiar with events, check out my earlier tutorial. Events aren't like shooting fish in a barrel to wrap your head around at first but are hugely powerful and frankly are at the core of implementing the new input system.
To get access to the C# events we offset need to generate a C# code for the actions we merely created.
Thankfully, Unity will exercise that piece of work for usa!
In the projection folders, select the Input Action Nugget that nosotros created at the beginning. In the inspector, y'all should meet a toggle labeled "Generate C# Course". Toggle this on and printing "use."
This should create a new C# script in the same location equally the input activeness asset and with the same name - unless you changed the default settings. You can open it up, but at that place's no need to edit it or practise any piece of work on information technology and so I'm but going to leave it be.
Custom Form
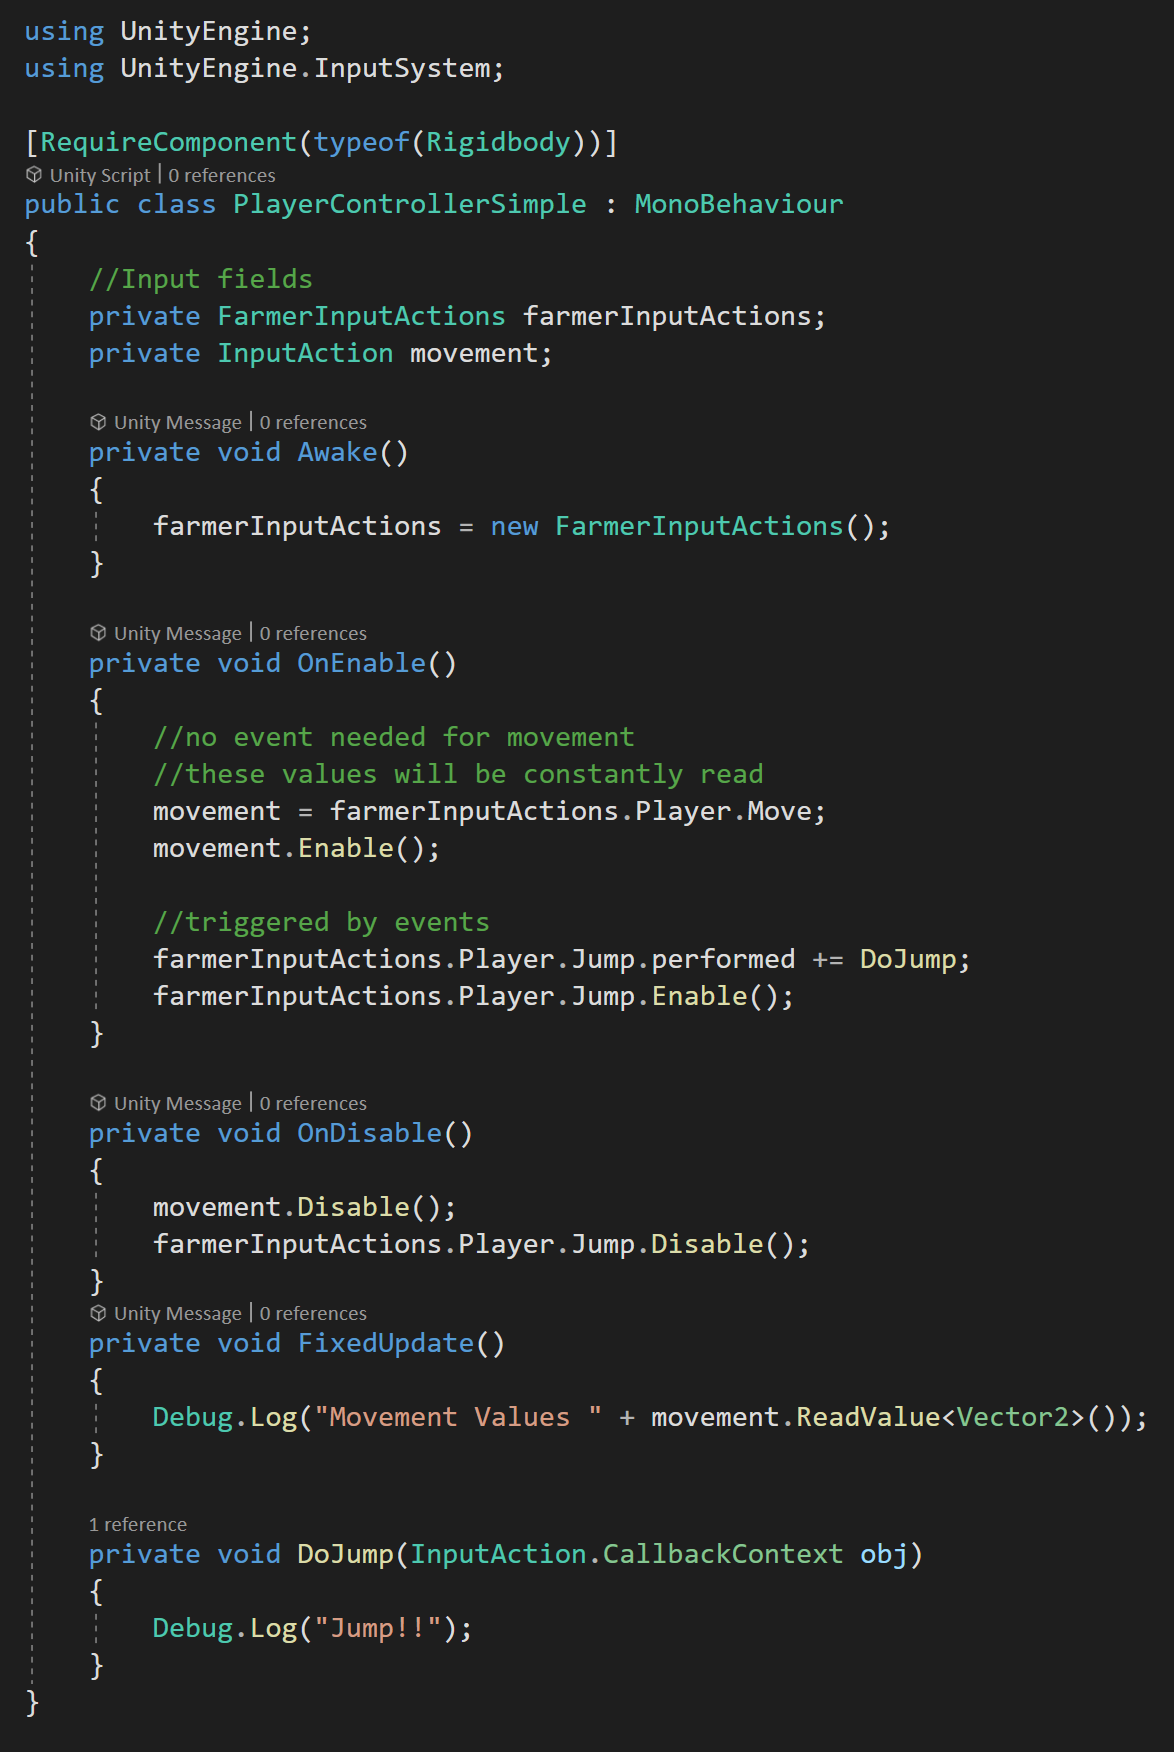
The "Simplest" Implementation of a the New Input System for Player Controller
Next, we'll need a custom player controller grade.
This class will demand access to the namespace UnityEngine.InputSystem.
So we'll need 2 new variables. The showtime is of the blazon of our newly created Input Action Nugget, in my case this is "Farmer Input Actions." And the second is of blazon Input Action and will hold a reference to our movement input action.
You can create a variable for each input action and cache a reference to it - I've seen many videos choose to do information technology this way. I have chosen not to do this with nigh of the input actions to go along the lawmaking compact for the purposes of this tutorial - it's up to you lot.
Also, for most event trigger deportment yous don't need to reference the input activeness outside of the OnEnable and OnDisable functions. Which for me lessens the need for a buried reference.
Earlier we showtime working with the input actions and events. We need to create a new case of the Input Action Asset.
I've chosen to do this in the Awake office. The fact that this player controller class will have its own example is important! The Input Activity Asset is not static or global!
With the instance created, we need to wire up the events and enable the input actions and this is best done in the OnEnable function.
For the movement input activeness, I'll cache a reference and yous tin can meet that this is accessed through the instance of the Input Action Asset, and then the Player activity map, and finally the move action itself. I am choosing to cache this reference considering we will need access to it in the fixed update function.
With the reference cached, nosotros need to enable the input action with the "Enable" role. Do notation that there is an "enabled" property that is not the aforementioned every bit the "Enable" function. If you forget to call this part, the input activeness will not work. Like a few other steps, this i defenseless me out a few times likewise.
The steps for the leap input action are like, but in this case, I won't exist caching a reference. Instead, I will be subscribing a function to the performed event on the spring input action. This subscribed function will become called each time the jump cardinal or button is pressed.
In that location is NO need to constantly bank check whether the jump button is pressed in an update role! This is i of the great improvements and advantages of the new arrangement. Cleaner code albeit at the toll of a chip more complexity.
To create the jump function you tin can exercise information technology manually, or in Visual Studio, you can right-click and choose "Quick Deportment and Refactoring" and and so cull "Generate Method." This will ensure that the input parameter is of the correct type. Then inside the function, nosotros can simply add a debug message to be able to test information technology.
The side by side step to the setup is to disable both the move and leap input actions. This should exist done in the OnDisable function. This may not be 100% needed merely ensures that the events won't get called and thus throw errors if the object is disabled. Besides notation, that I did not unsubscribe. While in most cases this won't be a problem or throw an error, but if the object is turned on and off the jump function will get called multiple times. This was spotted by a YT viewer (THANKS DAVE).
The final step for testing is to read the motility values in the fixed update office. I'm using fixed update because I'll use the physics engine to move and control the player the object. Reading the values is pretty straightforward. To keep things simple, I'll use another debug statement, and to get the values nosotros simply telephone call "Read Value" on the movement input action, give information technology a generic parameter of the type Vector2 since we have both Ten and Y values for movement.
Testing

At this point, we can exam out our solution to make sure everything is wired up correctly. To practice this nosotros just need to put our new player controller class on a gameObject and get into play style.
Pressing the WASD keys or moving the gamepad stick should show values in the console. While pressing the spacebar or the south button on the gamepad should brandish our jump message.
Whew!
If yous're thinking that was a lot of work to display some debug letters your right. It was. Only! We have a system that works for both a keyboard and a gamepad AND the lawmaking is actually quite simple and make clean. While the old system was quick to use the keyboard or mouse, calculation in a gamepad was a huge pain, non to mention we would need to code both inputs individually.
With the new system, the work is generally at the forepart cease creating (and agreement) the Input Activeness Asset. Leaving the implementation in the code much simpler. Which in my opinion is a worthy merchandise-off.
So What's Next?
I yet desire to look at a few more implementations of the new input system, but bluntly, this is getting long already. In the intro GIF you may have noticed a lot more functionality than the project currently has. ALL of the actress functionality is based on what I've shown already, just I think is worth covering - in another tutorial.
For now, if yous want to encounter my total implementation of the tertiary person controller (minus the camera) you lot can discover it hither on PasteBin. I will transition all the projection lawmaking to GitHub once the series is complete.
Topics I'd notwithstanding like to look at:
-
Creating the 3rd Person Controller
-
Controlling a Cinemachine Photographic camera
-
Triggering UI and SFX with the new Arrangement
-
Shooting!!
-
-
"Charging Upwards" for a power shot
-
Actor rebinding during playmode
-
Swapping action maps
-
UI? Boat? Car?
-
If y'all'd like to encounter one or all of those topics, get out a comment below. They're only worth doing if folks are interested.
Source: https://onewheelstudio.com/blog/2021/5/8/unitys-new-input-system
0 Response to "Unity Reading a Jump Input That Isn't Real"
Post a Comment